“`html
How to Paint Kitchen Cabinets
If you’re looking to give your kitchen a fresh new look without a full-scale remodel, painting your cabinets can be an excellent, cost-effective solution. This project allows you to update your kitchen’s style and breathe life into old or outdated cabinetry. In this guide, we’ll walk through all the essential steps, from preparation to the final touches. We’ll also explore the costs involved, the types of paint suitable for cabinets, and answer whether or not you should take on this DIY project. Grab your brushes, and let’s get started on transforming your kitchen space with a splash of color and creativity.
Project Details
Skill
Painting kitchen cabinets requires a moderate level of DIY skill. If you’ve painted walls before, you’re halfway there. The extra skill comes from the finer details, such as removing hardware and priming the surfaces. Patience and precision are essential for achieving a professional finish.
Ensure you’re comfortable with using both a brush and potentially a spray paint tool if your paint demands it. Some experience with woodwork could also be advantageous to tackle minor repairs or sanding tasks easily.
Cost
The cost of painting your kitchen cabinets can vary significantly based on the size of your kitchen and the quality of materials you choose. On average, you can expect to spend between $200 to $600 on paint, primer, and other necessary tools and supplies.
For a high-end finish, investing a bit more in quality paint can make all the difference, though it might push the cost upwards. Budget-conscious painters can still achieve great results by smartly selecting budget-friendly brands and materials.
Estimated Time
The time commitment for painting kitchen cabinets ranges from a weekend to a full week. The timeline depends on factors such as the number of cabinets, drying times between coats, and the complexity of your kitchen setup.
On average, prepping and painting take about 3 to 5 days if you’re working consistently, allowing suitable drying time between stages to ensure solid adherence of the paint and an impeccable finish.
How Much Does it Cost to Paint Kitchen Cabinets?
Before diving into the project, it’s crucial to understand the financial implications. The cost to paint kitchen cabinets includes supplies like primer, paint, brushes or spray tools, and prep materials like sandpaper and tape.
Professionals may charge anywhere from $1,500 to $3,500 depending on the size of your kitchen and the complexity of the job. If tackled as a DIY project, the costs significantly decrease, mostly constrained to materials.
Strategically cutting costs—like borrowing tools or opting for paint on sale—can keep the expenses down while still delivering beautiful results.
Should I Paint My Cabinets?
Deciding whether to paint your cabinets involves considering their current condition and whether a change will complement your kitchen’s style. If your cabinets are structurally sound, painting them can be an excellent way to refresh your space.
However, if the cabinetry shows severe wear or significant damage, you might want to reconsider painting as a suitable solution. In such cases, replacing or professionally refinishing might be more beneficial than DIY efforts.
Overall, painting is a suitable choice for those looking for budget-friendly kitchen updates with manageable effort and satisfying aesthetic results.
What Type of Paint Do I Need for Cabinets?
Oil or Latex?
The choice between oil-based and latex paint can influence the final look and durability of your painted cabinets. Oil-based paints offer a smoother finish with excellent adhesion, but they take longer to dry and require solvent cleanup.
Conversely, latex paint is popular due to its faster drying times, ease of use, and minimal cleanup with water. Modern latex formulations have improved significantly, making this a viable option for quality and durable results.
Brush or Spray Paint?
Brushes and rollers are traditional tools that are straightforward, cost-effective, and suitable for smaller projects or surfaces requiring precision. Achieving a smooth finish requires quality brushes and careful technique to avoid visible strokes.
Spray painting can deliver a factory-like finish with even coverage and minimal brush marks. Although more intricate to set up, it significantly speeds up the application process. It may require more protective measures to safeguard surrounding areas from overspray.
Can You Just Paint Over Cabinets or Should You Strip Them?
Painting directly over cabinets can compromise paint adhesion and final finish quality, especially if the existing paint or varnish surface is glossy or deteriorated. Stripping involves removing old paint or finishes, often a time-consuming but necessary step.
If you’re working with well-preserved cabinets, a thorough cleaning and light sanding might suffice for the paint to adhere properly. Always ensure surfaces are smooth and primed to avoid potential issues of peeling or chipping later on.
Regular or Faux Finish?
Choosing between a regular or faux finish impacts the aesthetic result of your kitchen cabinets. A regular finish provides a clean, classic look that can blend seamlessly with modern or traditional kitchen decor.
Faux finishes can introduce an element of artistic flair, mimicking textures like wood grain or marble, which could enhance specific kitchen themes. Experimenting with faux paint options allows homeowners to inject personalized style and creativity into their cabinetry.
Steps for Painting Cabinets
1. Prep the Room
Start by preparing your kitchen space for the painting process. This includes clearing counters, removing or covering furniture, and protecting floors with drop cloths. Proper ventilation is essential so ensure windows are open, or consider using fans.
Additionally, organize your tools and materials in an accessible manner. A well-prepared area minimizes accidents and increases efficiency, allowing you to focus efficiently on the painting process itself.
TIP: Set Up a DIY Paint Station
Consider setting up a dedicated painting station within your workspace. Use sawhorses or a temporary table to lay out cabinet doors and drawers for easy painting access. This setup ensures comfort as you work and aids in the drying process.
A paint station allows you to move around freely and gives you ample space to handle and dry all components effectively. Limit distractions by maintaining a clutter-free environment focused on the task at hand.
2. Remove the Doors, Drawers, and Shelves
Begin by removing cabinet doors, drawers, and shelves. This step facilitates better access to all surfaces and ensures a more thorough painting job. Label everything as you go to ensure an easier reassembly process later.
Use a screwdriver to detach hinges and handles, carefully storing screws and hardware in marked containers. Taking the time to disassemble properly could make the subsequent steps simpler and more efficient.
3. Clean All the Surfaces
Cleaning is a fundamental step where attention to detail pays dividends in the final result. Use a degreasing cleaner or a mixture of warm water and detergent to eliminate buildup, grease, and contaminants from all surfaces.
A clean surface enhances paint adhesion and can even reveal areas that require additional attention or repair before painting begins. Let surfaces dry completely before progressing to the next stage.
4. Prep the Boxes
Cabinet boxes, often overlooked in favor of doors and drawers, deserve equal preparation. Sand the surfaces lightly, removing any roughness and ensuring all existing paint or varnish is minimally glossy for the primer to attach efficiently.
Inspect boxes for imperfections such as scratches or dents, using wood filler to address any such issues. Prepping boxes uniformly ensures a seamless, cohesive final appearance across the entire cabinet assembly.
5. Prime the Cabinet Boxes
Priming the boxes is pivotal for achieving a long-lasting finish. Use a high-quality primer suitable for your cabinet surface material, applying it evenly across all box faces and edges.
The primer layer acts as a binding agent between the surface and the paint, particularly important if you’re transitioning from a darker to lighter color. Allow ample drying time as per the manufacturer’s instructions before proceeding.
6. Sand, Caulk, and Fill
Once the primer is dry, lightly sand the surface to eliminate any primer imperfections, ensuring your final paint layer is flawless. Vacuum any dust created during sanding, and promptly wipe down surfaces with a tack cloth.
Inspect for gaps or seams along corners and moldings—applying caulk where necessary. Fill any dents or deep scratches with wood filler, granting additional effort will deliver a pristine finished product.
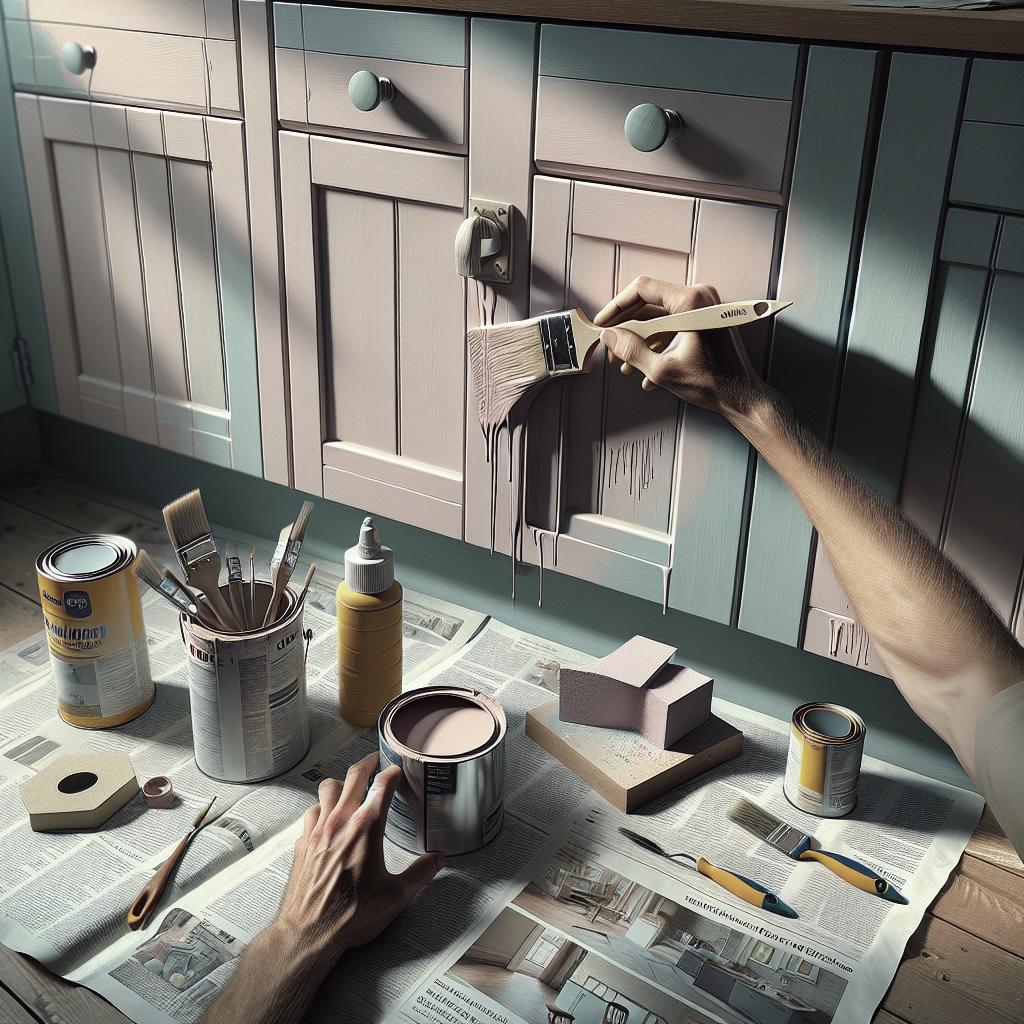
7. Paint the Cabinet Boxes
With the boxes primed and smooth, it’s time to apply the paint. Choose your method of application—brush or sprayer—based on the chosen paint and personal convenience. Apply thin, even coats, allowing proper drying time between them.
Patience is invaluable here; rushing may lead to unsightly drips or uneven texture. Assess each coat as it dries, touching up any areas as necessary for a uniform result.
8. Prep, Prime, and Paint the Doors, Drawers, and Shelves
Turn your attention to cabinet doors, drawers, and shelves. Undertake the same careful prep, ensuring surfaces are clean and smooth before priming. These components often set the visual tone for your cabinetry arrangement.
Follow the primer with multiple thin coats of paint. Remember to handle each piece with care, reducing the chance of damage or watermarking on the wet paint as you progress.
9. Put Back All the Pieces
With all components painted and thoroughly dried, it’s time to reassemble your cabinets. Carefully reattach doors and drawers, ensuring that hardware and hinges are firmly secured and aligned.
Taking this process step-by-step prevents the risk of damaging fresh paint. Once set, you can enjoy the transformative results and marvel at your updated kitchen space.
Shopping List
Compiling a comprehensive shopping list before starting ensures you have all the necessary materials, minimizing interruptions during the project. Your list should include paint, primer, sandpaper, brushes or sprayers, degreaser, wood filler, caulk, and protective drop cloths.
Adding painter’s tape, cleaning rags, and gloves to protect your skin can also be worthwhile. A thorough, planned approach provides a smooth, effective workflow from prep to the final drying stage.
Tools
Tools play an essential role in ensuring a quality finish. Key tools include a screwdriver for disassembly, sandpaper for smoothing, brushes or rollers for painting, as well as a tack cloth for cleaning.
Investing in a dust mask or respirator is advisable to protect against fine sanding dust and paint fumes. If opting for a spray finish, an HVLP (High Volume Low Pressure) sprayer could deliver professional-grade results.
Next Up In Painting
| Aspect | Details |
|---|---|
| Skill Required | Moderate – Experience with painting and basic woodworking recommended |
| Cost | Estimated $200 – $600 for DIY, around $1,500+ for professionals |
| Time Commitment | 3 to 5 days for DIY projects, depending on drying time and size of the kitchen |
| Paint Choice | Consider oil vs. latex, brush vs. spray options for best results |
| Procedure Highlights | Thorough prep, cleaning, priming, sanding, and caulk are crucial steps |
| Tools and Materials | Brush, sprayer, sandpaper, primer, paint, degreaser, wood filler, caulk |
“`